To contact us Click
HERE

SUPPLIES & TOOLS:
- 2 blocks each of FIMO® soft: white
- 1 block each of FIMO® soft: raspberry, pacific blue
- 1 block each of FIMO® effect: nightglow (glow-in-the-dark)
- Gloss varnish or spray sealer (optional)
- Craft knife
- Toothpicks
- Clay modeling tool
- Baking tray
- Smooth work surface (glass or ceramic tile)
- Paintbrush
DIRECTIONS:Follow these directions to make a blue unicorn1. Mix one strip of the pacific blue clay and a whole block of white clay. Keep adding small bits of the blue until correct shade is attained. Divide this clay in half and make a large ball for the body, a smaller ball for the head and two even smaller balls for the ears.
2. Shape the large ball into a big, large comma shape for the body and taper the next ball at one end to make the head with a rounded point for the nose. Shape the two smallest balls into triangle shapes for the ears. Attach all these pieces together. Note: for a better hold, scratch both surfaces where they will be attached with the end of a craft knife.
3. Make four balls of equal size for the legs. Shape these so the foot is slightly larger at the bottom.
4. Attach the legs to the body by carefully pressing the pieces together. Cut toothpicks in half and insert four of them halfway into the body for extra support. Attach the legs onto these posts.
5. Time to make the mane and tail. Take the pacific blue color and make three sizes of balls. Roll each into logs with one end tapering to a point.
6. Use the end of a paintbrush to indent a spot for the tail and insert the grouped blue logs. Do the same for the hair between the ears.
7. Roll four spiked logs and insert into the back of the neck for the mane.
8. Shape a small cone out of the FIMO® nightglow for the horn and colored balls to make a flower accent. Use a toothpick to make indents for the eyes and mouth. Use a smoother modeling tool or the end of a paintbrush to make two indents for the nostrils.
Follow these directions to make a pink unicorn1. Soften the raspberry clay using hands. Divide this clay in half and make a large ball for the body, a smaller ball for the head and two even smaller balls for the ears.
2. Shape the large ball into a big, large comma shape for the body and taper the next ball at one end to make the head with a rounded point for the nose. Shape the two smallest balls into triangle shapes for the ears. Attach all these pieces together. Note: for a better hold, scratch both surfaces where they will be attached with the end of a craft knife.
3. Make four balls of equal size for the legs. Shape these so the foot is slightly larger at the bottom.
4. Attach the legs to the body by carefully pressing the pieces together. Note the position of these legs for a unicorn in a sitting position.
5. Time to make the mane and tail. Take the nightglow color and make three sizes of balls. Roll each into logs with one end tapering to a point.
6. Use the end of a paintbrush to indent a spot for the tail and mane and insert the grouped nightglow logs. Do the same for the hair between the ears.
7. Mix a tiny amount of raspberry with white to make a light pink for the horn. Roll into a log and give it a gentle twist coming to a point at one end. Make an indention with the end of a paintbrush and insert this into the top of the head. Use a toothpick to make indents for the eyes and mouth. Use a smoother modeling tool or the end of a paintbrush to make two indents for the nostrils.
8. Make accessories like a necklace, horseshoe and show ribbon.
Bake all the clay pieces on a metal baking tray in a conventional oven for 30 minutes at 230°F. Allow to cool completely before removing from the tray. Use FIMO gloss varnish or a spray sealer for a shinny effect.
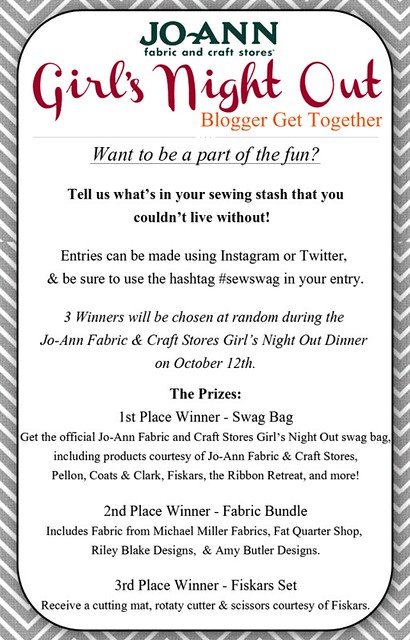
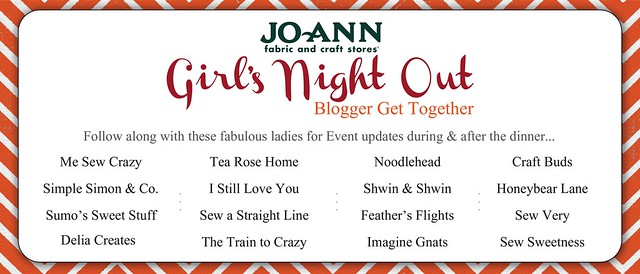
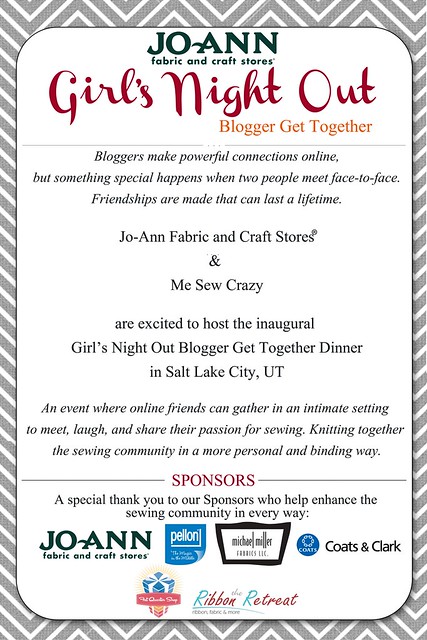 We know it's going to be a great night with some amazing bloggers who love (love!) sewing. But wait... there's more!
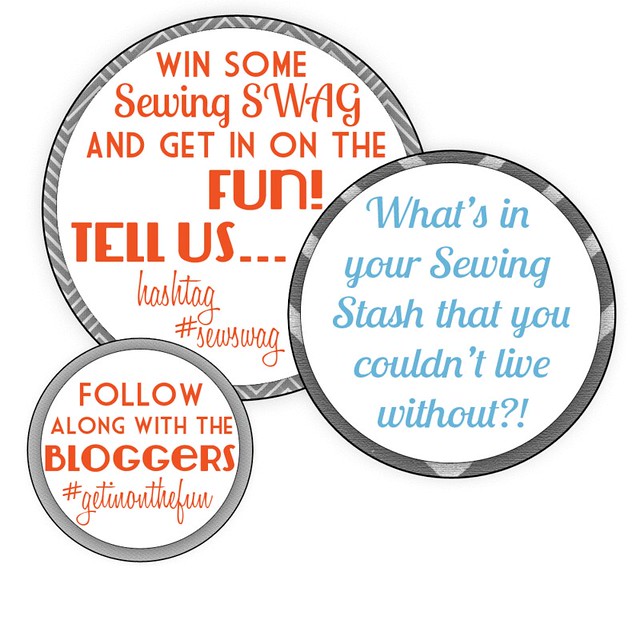
 Studio Art Quilters Association is having an exhibit titled "I'm Not Crazy" which explores mental health issues. I think the title is offensive but whatever. It is the perspective or someone with mental illness, a caretaker or friend or family member of someone with mental illness. I have a very close friend who is Bipolar and is medicated to have balance in her life. This quilt is my interpretation of being bipolar-one minute she is happy, hyper bouncing off the wall and the next sad, depressed and angered. I used muted sad, dull colors to represent being depressed and, of course, the frustrated facial expression. I used bright colored fabrics with lots of chaos for the manic side's clothing, make up and jewelry. Her hair is out of control and her facial expression shouts "manic." I used lots of desciptive words on both sides of the personality in a subtle way in the background. I purposely went subtle because in society we don't want to talk about mental health issues and they are subtle and quiet in our discussions. I found there is a two sided smiley face which symbolizes Bipolar Disorder and I added it to the quilt in the lower center of the quilt.
 This photo is a closeup of the depressed personality.
 And this is a photo of the manic personality. She's kind of "out there!" Her expression deminds me of Johnny Depp as the Mad Hatter in Alice in Wonderland!!
 Cloeup of the Bipolar symbol and a few of the background words.I embellished the manic side with hand made Sculpey clay beads, a beaded earring, rhinestones for pierced earrings, orange lame' in the hair to symbolize being wired, and some fabric paint. The intent was for excess and chaos in hair, make up, clothing and jewelry. The depressed side has a necklace made to buttons made from leather (pretty cool from a quilt show!), a few beads for the necklace and a rhinestone for the nose piercing. Both have a little fabric paint for details.
 Well I am having a month of rejections!! I applied for an article in Quilting Arts Magazine and was rejected earlier in June. My piece for the "I'm Not Crazy" for SAQA was not selected. They had 128 entries and only chose 20. I'm very bummed about this one because this subject is very personal to me and I put alot of emotion into that piece. Then I entered the Quilting Arts Magazine's Reader Challenge on Signature Color and there were over 150 entries and only 15 were chosen. I had a blast on this little 8" x 8" project including the beading around the binding. This will be a cute addition to my studio and it makes me smile. I'm just a bit unsure if I want to participate in these things for a while. It seems abstract art is trendy at the moment and representational art is on the back burner. I still love to made art and will continue.
 I made this small quilt to celebrate winter where I live in Upper Michigan. I used my original pattern in which I made 2 square wall hangings last summer-one in purple/yellow and one with values of pink. I wanted to have a scarf that was blowing in the wind so I made this quilt in a rectangle shape. I cut 5" squares in variations of light, medium and dark values of blue including as many snowflake themed fabrics as I had (I bought a few extra!.) I changed my original pattern by adding an earmuff and the scarf and taking the hair to a closer to the head amount. I went total monochromatic with the color scheme-blue fabric, blue threads, and many blue embellishments. I found these great little hologram icecicle beads on my travels in Madison Wisconsin at the Wisconsin Quilt Expo and used them on this quilt. I have blue glitter on the eyelid, nail polish on the lips and scarf ends and a few rhinestones scatter about. I wanted an icecicle motif on the cheekbone area and created them this way-I Goodle searched icecicle images on the computer and when I found one I liked I drew up an image to the size I wanted. I then used Carol Doak foundationl paper in my computer and copied 3 icecicles-2 for the cheeks and one for the chin. Then I placed the icecicles on the quilt individually and stitches in a smaller stitch with blue variegated thread. When finished I removed the paper which comes off pretty nice compared to regular computer paper. I used a 2 color binding to accentuate the contrast of light and dark in the quilt. This quilt is just for fun and not for a quilt jury-somethimes I have to be be fluffy!!
 The second photo is a detail version to show the icecicles on the face.
 I love the "Swoon" block done scrappy style. The three quilts below are the wall hangings I made last summer as teaching tools for my lectures on the elements/principles of design for quilters. I am teaching a 6 part series of classes called "Design Confidence for Quilters" at Pine Street Quilts in Marinette, WI where I work part-time. The second class is this Tuesday, Jan. 29, 2013 and it is about asymmetrical balance and value. I decided to make a scrappy Swoon in 13 values from solid white to dark black prints with a solid black Kona Cotton background. (I love Kona Cottons-the feel of the fabric is wonderful and they press nicely!) I usually choose quilts with lots of color and by the time I was ready to add the binding I "had" to add a bit of color and I was working with reds at the quilt retreat last weekend so red was my binding choice. When the quilt was finished I decided to add an accent of red in the center by adding a large red button to the quilt. I quilted this piece with a variegated black and white thread. The Swoon block is 24" x 24." When I first looked at the quilt from a distance for the first time there was a secondardy image of whitish tulips in the four corners which wasn't planned but when you consider that whites are prominant it is a great teaching tool for studying value. I learned I had very little gray fabrics in my stash and now I do!!
 This was my first Swoon block using the 12 + 1 colors of the color wheel.
 This is my example of the same color placement but all the colors have been "tinted" with white or pastels. I would not usually do an all pastel quilt unless a baby quilt or possibly a spring theme quilt.
 This example is the same color placement but all the colors have been "shaded" with black. I did brighten the golds a bit to make the quilt prettier. Some people use all darks in their quilts such as Thimbleberies and Kansas City Troubles fabrics. I am a brighter style fabric person and I like the original color wheel quilt the best. At some point I should make a "tone" style quilt but they are my least favorite fabrics. But for educational purposes I NEED to make one!!
 SUPPLIES & TOOLS
 Top 10 Reasons Why Phoomph is Amazing!